Toyota RAV4 (XA40) 2013-2018 Service Manual: Back door outside garnish
Components

Removal
- Disconnect cable from negative battery terminal
Caution:
Wait at least 90 seconds after disconnecting the cable from the negative (-) battery terminal to prevent airbag and seat belt pretensioner activation.
- Remove back door center garnish (see page ed-59)
- Remove back door side garnish lh (see page ed-59)
- Remove back door side garnish rh (see page ed-59)
- Remove back door courtesy light switch assembly (see page li-122)
- Remove back door trim board (see page ed- 59)
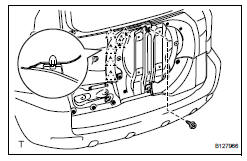
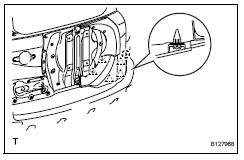
- Remove lower back door outside garnish sub-assembly lh

- Remove the screw and the 7 clips.
- Remove the back door outside garnish and disconnect the connector
- Remove the license plate light (see page li-110 ).
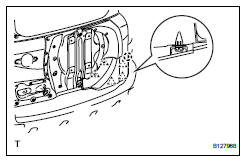
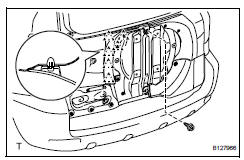
- Remove upper back door outside garnish sub-assembly lh
- Remove the screw and the 6 clips.
- Remove the back door outside garnish.
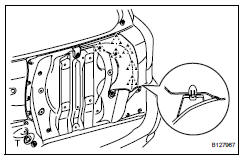
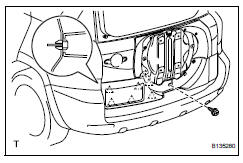
- Remove lower back door outside garnish sub-assembly rh
- Remove the 5 clips and detach the claw.
- Remove the back door outside garnish.
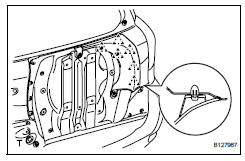
- Remove upper back door outside garnish sub-assembly rh
- Remove the 6 clips and back door outside garnish.
Installation
- Install upper back door outside garnish sub-assembly rh
- Attach the 6 clips to install the back door outside garnish.
- Install lower back door outside garnish sub-assembly rh
- Install the back door outside garnish.
- Attach the claw and 5 clips.
- Install upper back door outside garnish sub-assembly lh
- Attach the 6 clips to install the back door outside garnish.
- Install the screw.
- Install lower back door outside garnish sub-assembly lh
- Install the license plate light (see page li-111).
- Connect the connector.
- Attach the 7 clips to install the back door outside garnish.
- Install the screw.
- Install back door trim board (see page ed- 66)
- Install back door courtesy light switch assembly (see page li-123)
- Install back door side garnish lh (see page ed-67)
- Install back door side garnish rh (see page ed-67)
- Install back door garnish center (see page ed-67)
- Connect cable to negative battery terminal
 Installation
Hint:
Use the same procedures for the rh side and lh side.
The procedures listed below are for the lh side.
When installing the moulding, heat the vehicle body and
moulding using a heat ligh ...

Other materials:
Components
(2006/01- )
...
Checking and replacing
fuses
If any of the electrical components do not operate, a fuse may
have blown. If this happens, check and replace the fuses as necessary.
Vehicles without a smart key system:
turn the engine switch to the “lock” position.
Vehicles with a smart key system:
turn the engine switch off.
Aft ...
Cleaning and protecting the vehicle interior
Perform cleaning in a manner
appropriate to each
component and its material.
Protecting the vehicle
interior
Remove dirt and dust using a
vacuum cleaner. Wipe dirty
surfaces with a cloth dampened
with lukewarm water.
If dirt cannot be removed,
wipe it off with a soft cloth
dampened with neut ...
