
Toyota RAV4 (XA40) 2013-2018 Service Manual: Installation
- Install ecm
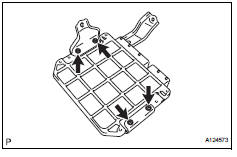
- Install the 2 brackets to the ecm with the 4 screws.
Torque: 3.0 N*m (30 kgf*cm, 27 in.*Lbf)
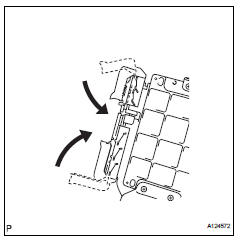
- Connect the 2 ecm connectors.
Notice:
When connecting the connector, make sure that dirt, water and other foreign matter does not become stuck between the connector and other part.
- Connect the 2 ecm connectors and lower the 2 levers.
Notice:
Make sure that the 2 levers are securely lowered.
- Install the ecm with the 3 bolts.
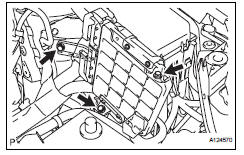
Torque: 6.5 N*m (66 kgf*cm, 57 in.*Lbf)
- Install air cleaner case
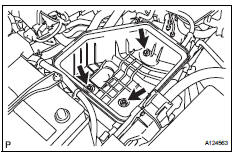
- Install the air cleaner case with the 3 bolts.
Torque: 5.0 N*m (51 kgf*cm, 44 in.*Lbf)
- Connect the harness clamp.
- Install air cleaner cap (see page es-413)
- Connect cable to negative battery terminal
- Perform registration
- When replacing the ecm, the vehicle identification number (vin) must be input into the replacement ecm (see page es-13).
- When replacing the ecm, perform the vehicle stability control system recognition in the ecm (see page cc-12).
- Reset memory
- When replacing the ecm, perform the reset memory procedure (a/t initialization) (see page ax-18).
 Removal
Disconnect cable from negative battery
terminal
Caution:
Wait at least 90 seconds after disconnecting the
cable from the negative (-) battery terminal to
prevent airbag and seat belt preten ...
 Accelerator pedal rod
Components
...
Other materials:
Occupant classification ecu malfunction
Description
Dtc b1795 is recorded when a malfunction is detected in the occupant
classification ecu.
Troubleshoot dtc b1771 first when dtc b1771 and b1795 are output simultaneously.
Wiring diagram
Inspection procedure
Check for dtc
Turn the ignition switch on, and wait ...
Fuel pressure regulator
Components
Removal
Remove fuel tank assembly
Remove the fuel tank (see page fu-39).
Remove fuel tank main tube sub-assembly
Remove the joint clip and fuel tank main tube.
Caution:
Before removing the tube joint clip, check for
foreign matter around the cli ...
Rear occupant classification sensor lh collision detection
Description
Dtc b1787 is output when the occupant classification ecu receives a collision
detection signal sent by
the rear occupant classification sensor lh when an accident occurs.
Dtc b1787 is also output when the front seat assembly rh is subjected to a
strong impact, even if an
actua ...
