Toyota RAV4 (XA40) 2013-2018 Service Manual: Integration relay
On-vehicle inspection
- Disconnect cable from negative battery terminal
Caution:
Wait at least 90 seconds after disconnecting the cable from the negative (-) battery terminal to prevent airbag and seat belt pretensioner activation.
- Inspect integration relay
Notice:
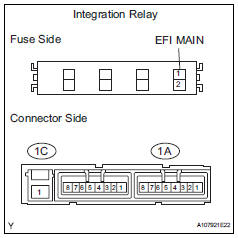
- The efi relay is built into the integration relay (unit a: efi main).
- Some relays are built into the integration relay.
The integration relay cannot be disassembled. If there is a malfunction in the circuit of the integration relay, replace the integration relay.
- Using a screwdriver, detach the 2 claws and disconnect the integration relay from the no. 1 Engine room junction block.
Hint:
Tape the screwdriver tip before use.
- Disconnect the 3 connectors from the integration relay.

- Inspect the efi relay.
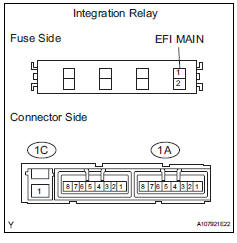
- Check the resistance of the efi main fuse.
If the result is not as specified, replace the efi main fuse.
- Measure the resistance of the integration relay.
Standard resistance 
If the result is not as specified, replace the integration relay.
- Connect cable to negative battery terminal
 Installation
Install knock sensor
Install the sensor with the nut.
Torque: 20 n*m (205 kgf*cm, 15 ft.*Lbf)
Notice:
Make sure that the knock sensor is in the
correct position.
Connect the sen ...
 Ig1 relay
On-vehicle inspection
Disconnect cable from negative battery
terminal
Caution:
Wait at least 90 seconds after disconnecting the
cable from the negative (-) battery terminal to
prevent airb ...
Other materials:
Back door
The back door can be locked/unlocked and opened/closed by
the following procedures.
Locking and unlocking the back door
Door lock switch
Entry function (if equipped)
Wireless remote control
Opening/closing the back door from inside the vehicle (vehicles
with a power back door)
Press a ...
Utility vehicle precautions
This vehicle belongs to the
utility vehicle class, which
has higher ground clearance
and narrower tread in
relation to the height of its
center of gravity to make it
capable of performing in a
wide variety of off-road
applications.
Utility vehicle feature
Specific design characteristics
give it a ...
Automatic air conditioning
system
Air outlets and fan speed are automatically adjusted according
to the temperature setting.
Air conditioning controls
Automatic mode switch
Left-hand side temperature control knob
Right-hand side temperature control knob
"SYNC" switch
"OFF" switch
Windshield defogger switch
Rear window and o ...
