
Toyota RAV4 (XA40) 2013-2018 Service Manual: Light control switch circuit
Description
This circuit detects the state of the headlight dimmer switch.
Wiring diagram
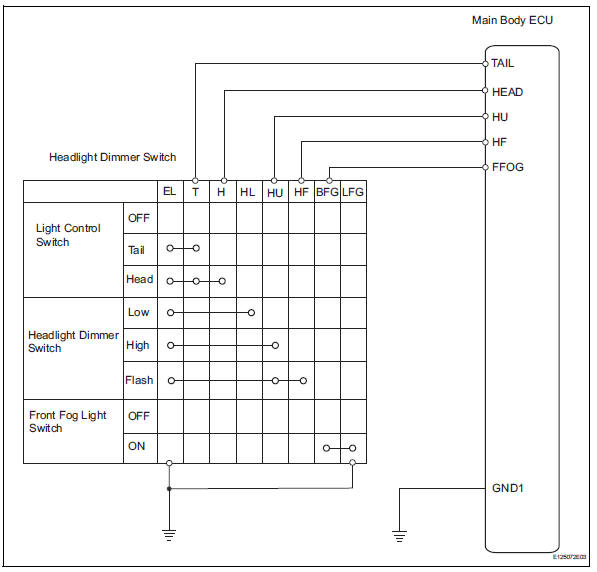
Inspection procedure
- Read value of intelligent tester (main body ecu)
- Connect the intelligent tester to the dlc3.
- Turn the ignition switch on and press the intelligent tester main switch on.
- Select the items below in the data list, and read the displays on the intelligent tester.
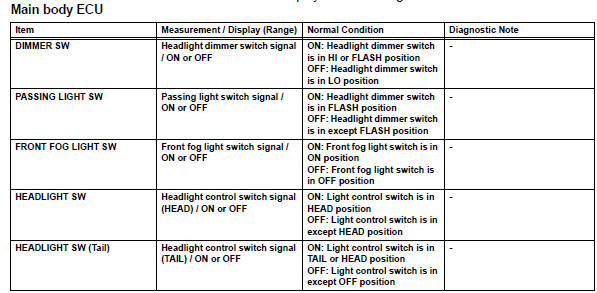
Ok: on is displayed on the intelligent tester screen.


- Inspect headlight dimmer switch
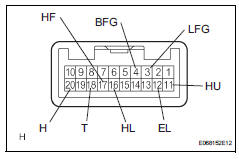
- Remove the headlight dimmer switch.
- Measure the resistance of the switch.
Standard resistance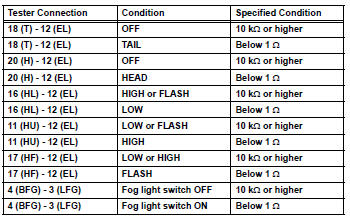


- Check wire harness (main body ecu - dimmer switch and body ground)
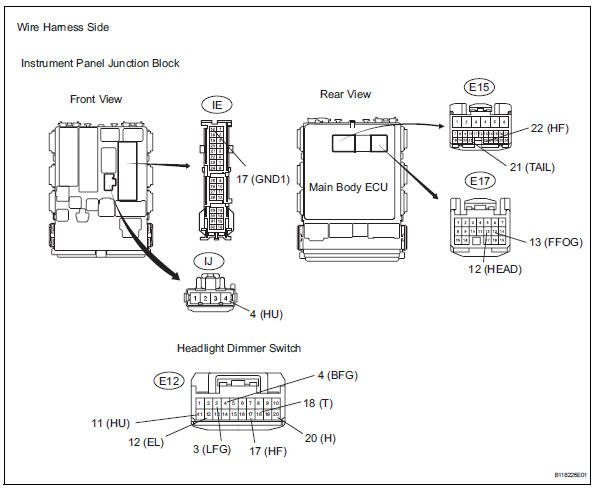
- Disconnect the e12 headlight dimmer switch connector.
- Disconnect the ie and ij instrument panel junction block connectors.
- Disconnect the e15 and e17 main body ecu connectors.
- Measure the resistance of the wire harness side connectors.
Standard resistance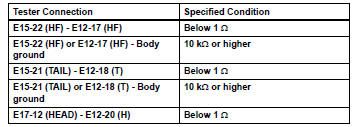
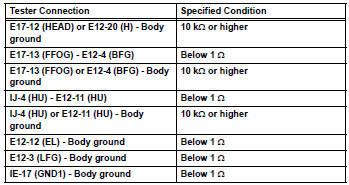


Replace instrument panel junction block (main body ecu)
 Back-up light circuit
Description
The park / neutral position switch turns on when the shift lever is moved
into the r position, causing the
back-up lights to illuminate.
Wiring diagram
Inspection procedure
I ...
 Door courtesy switch circuit
Description
The main body ecu detects the condition of the door courtesy switch.
Wiring diagram
Inspection procedure
Read value of intelligent tester (door courtesy light switch)
Conn ...
Other materials:
Precaution
Caution:
The vehicle is equipped with a supplemental restraint
system (srs), which consists of a steering pad, front
passenger airbag, curtain shield airbag, front seat side
airbag, seat belt pretensioner, center airbag sensor,
front airbag sensor, side airbag sensor, rear airbag
senso ...
Brake booster
Installation
(2005/11-2006/01)
Install check valve grommet
Install the grommet to the booster.
Install brake vacuum check valve
assembly
Install the check valve to the grommet.
Install brake booster gasket
Install a new gasket to the booster.
Install brake ...
Coolant
Replacement
Remove no. 1 Engine under cover
Drain engine coolant
Loosen the radiator drain cock plug.
Hint:
Collect the coolant in a container and dispose of it
according to the regulations in your area.
Remove the radiator reservoir cap.
Caution:
Do not remove the radiator ...
