Toyota RAV4 (XA40) 2013-2018 Service Manual: Removal
- Disconnect cable from negative battery terminal
Caution:
Wait at least 90 seconds after disconnecting the cable from the negative (-) battery terminal to prevent airbag and seat belt pretensioner activation.
- Remove no. 1 Engine under cover
- Remove front fender apron rh
- Remove radiator support opening cover
- Drain engine coolant (see page co-6)
- Remove front suspension member reinforcement rh (see page em-6)
- Remove fan and generator v belt (see page em-6)
- Remove generator assembly (see page ch-9)
- Remove water pump pulley
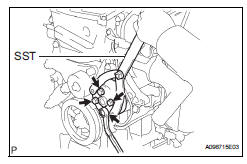
- Using sst, remove the 4 bolts and water pump pulley.
Sst 09960-10010 (09962-01000, 09963-00700)
- Remove water pump assembly
- Remove the clamp of the crankshaft position sensor from the water pump.
- Disconnect the wire of the crankshaft position sensor from the clamp bracket.
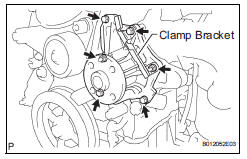
- Remove the 4 bolts, 2 nuts and clamp bracket.
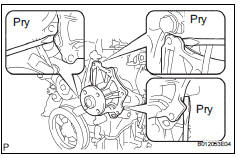
- Using a screwdriver, pry between the water pump and cylinder block, and then remove the water pump.
Notice:
Be careful not to damage the contact surfaces of the water pump and cylinder block.
 Water pump
...
 Inspection
Inspect water pump assembly
Visually check the drain hole for coolant leakage.
If leakage is found, replace the water pump
assembly.
Turn the pulley, and then check that the water ...
Other materials:
General maintenance (2006/01- )
Inspect drive belt (see page em-7)
Replace spark plugs (see page ig-7)
Replace air cleaner filter
Remove the air filter.
Visually check that the air filter is not excessively
damaged or oily.
Replace the air filter with a new one, if necessary.
Replace engine oil and oil fil ...
Rear window and outside rear view mirror defoggers
These features are used to defog the rear window, and to
remove raindrops, dew and frost from the outside rear view mirrors
(if equipped).
Vehicles with a manual air conditioning system
On/off
The defoggers will automatically
turn off after approximately 15 minutes.
Vehicles with an au ...
Seat position sensor
Components
On-vehicle inspection
Check seat position sensor (vehicle not
involved in collision)
Perform a diagnostic system check (see page rs-
49).
Check seat position sensor (vehicle
involved in collision)
Perform a diagnostic system check (see page rs-
49).
Ev ...
