Toyota RAV4 (XA40) 2013-2018 Service Manual: Removal (2005/11-2006/01)
- Disconnect cable from negative battery terminal
Caution:
Wait at least 90 seconds after disconnecting the cable from the negative (-) battery terminal to prevent airbag and seat belt pretensioner activation.
- Remove air cleaner case sub-assembly
- Remove the air cleaner case (see page em-98).
Hint:
Refer to the procedures from the removal of the purge vsv up until the removal of the air cleaner case.
- Drain brake fluid
Notice:
Wash off brake fluid immediately if it comes in contact with any painted surface.
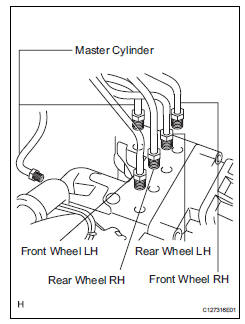
- Disconnect brake lines
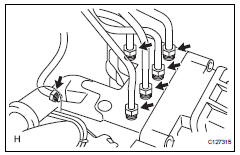
- Using sst, disconnect the 6 brake lines from the actuator.
Sst 09023-00101
- Place tags or marks to identify the installation locations of each brake line.
- Remove abs and traction actuator assembly with bracket

- Pull the lock lever upward and disconnect the connector.
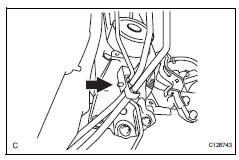
- Disconnect the brake tube clamp from the bracket.
- Remove the 3 nuts and actuator with bracket.
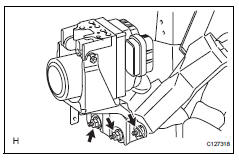
Notice:
Be careful not to damage the brake tubes.
 On-vehicle inspection
Connect intelligent tester
Connect the intelligent tester to the dlc3.
Start the engine and idle it.
Select the active test mode on the intelligent tester.
Hint:
Please refer to t ...
 Removal (2006/01- )
Disconnect cable from negative battery
terminal
Caution:
Wait at least 90 seconds after disconnecting the
cable from the negative (-) battery terminal to
prevent airbag and seat belt preten ...
Other materials:
Solar sensor (for automatic air conditioning system)
Components
Removal
Disconnect cable from negative battery
terminal
Caution:
Wait at least 90 seconds after disconnecting the
cable from the negative (-) battery terminal to
prevent airbag and seat belt pretensioner activation.
Remove solar sensor
Using a screwdriver, p ...
Reassembly
V
Attach the 7 outside moulding retainers to install the
extension.
Install front bumper extension rh (for wide
body)
Hint:
Use the same procedures described for the lh side.
Install front bumper hole cover lh (w/o fog
light)
Install the bumper hole cover with ...
Vehicle information display
â– Drive information
2 items that are selected using
the "Drive Info Items" setting
(average speed, distance and total time) can be displayed vertically.
The displayed information
changes according to the "Drive
Info Type" setting (since the system
was started or between
resets).
Use the displayed ...
