Toyota RAV4 (XA50) 2019-2026 Owners Manual: Sensor detection display, object distance
â– Detection range of the sensors
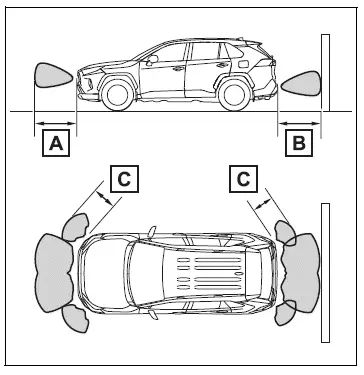
- Approximately 3.3 ft. (100 cm)
- Approximately 4.9 ft. (150 cm)
- Approximately 2.1 ft. (63 cm)
The diagram shows the detection range of the sensors. Note that the sensors cannot detect objects that are extremely close to the vehicle.
The range of the sensors may change depending on the shape of the object, etc.
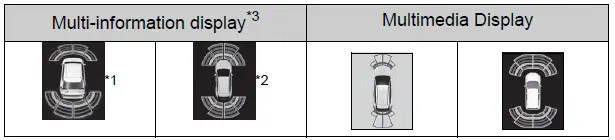
â– Distance display
When an object is detected by a sensor, the approximate distance to the object will be displayed on the multi-information display or Multimedia Display. (As the distance to the object becomes short, the distance segments may blink.) The images may differ from that shown in the illustrations.
- Approximate distance to object
- Front center sensor: 3.3 ft. (100 cm) to 2.1 ft. (63 cm)
- Rear center sensor: 4.9 ft. (150 cm) to 2.1 ft. (63 cm)
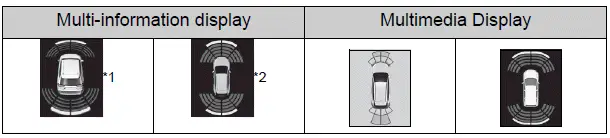
*1:Vehicles with 7-inch multi-information display *2:Vehicles with 12.3-inch multi-information display
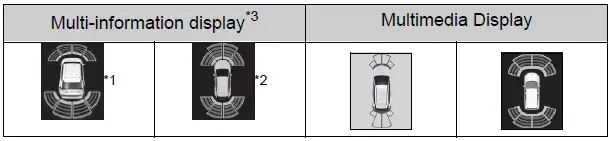
- Approximate distance to object: 2.1 ft. (63 cm) to 1.6 ft. (48 cm)
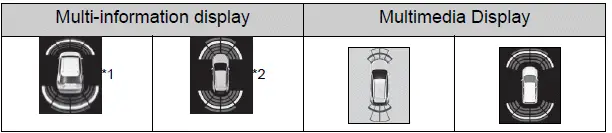
*1:Vehicles with 7-inch multi-information display *2:Vehicles with 12.3-inch multi-information display
Approximate distance to object: 1.6 ft. (48 cm) to 1.1 ft. (34 cm)
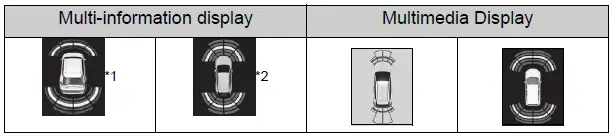
*1:Vehicles with 7-inch multi-information display *2:Vehicles with 12.3-inch multi-information display
- Approximate distance to object: 1.1 ft. (34 cm) to 0.5 ft. (15 cm)
*1:Vehicles with 7-inch multi-information display *2:Vehicles with 12.3-inch multi-information display *3:The distance segments will blink slowly.
- Approximate distance to object: Less than 0.5 ft. (15 cm)
*1:Vehicles with 7-inch multi-information display *2:Vehicles with 12.3-inch multi-information display *3:The distance segments will blink rapidly.
â– Buzzer operation and distance to an object
A buzzer sounds when the sensors are operating.
- The buzzer beeps faster as
the vehicle approaches an
object.
When the vehicle comes within approximately 1.1 ft. (34 cm) of the object, the buzzer sounds continuously.
- When 2 or more sensors simultaneously detect a static object, the buzzer sounds for the nearest object.
- Even when the sensors are
operating, the buzzer will be
muted in some situations.
(automatic buzzer mute function)
â– Muting the buzzer sound
- Automatic buzzer mute function
Even when the sensors are operating, the buzzer will be muted in the following situations:
- The distance between the vehicle and the detected object does not become shorter (except when the distance between the vehicle and object is 1.1 ft. [34 cm] or less).
- Your vehicle is moving away from the object.
- There are no detectable objects entering the path of your vehicle.
However, if another object is detected or the situation changes while the buzzer is muted, the buzzer begins sounding again.
- To mute the buzzer sound
The buzzer can be temporarily
muted by pressing  of the meter
control switches while a suggestion
that says mute is available is shown
on the multi-information display.
- When the mute is canceled
Mute will be automatically canceled in the following situations.
- When the shift position is changed
- When the vehicle speed has reached or exceeded a certain speed
- When the Intuitive parking assist is turned off once and turned on again
- When the engine switch is turned off once and turned to ON again
â– Customization
The buzzer volume can be adjusted on the multi-information display.
 Intuitive parking assist
The distance from your
vehicle to objects, such as a
wall, when parallel parking
or maneuvering into a
garage is measured by the
sensors and communicated
via the multi-information
display or Multimedi ...
 RCTA (Rear Cross Traffic
Alert) function
RCTA (Rear Cross Traffic
Alert) function
The RCTA function uses the
BSM rear side radar sensors
installed behind the rear
bumper. This function is
intended to assist the driver
in checking areas that are
not easily visible when
backing up.
W ...
Other materials:
Rear wheel alignment
adjustment
Inspect tire
Inspect the tire (see page tw-1).
Measure vehicle height
Measure the vehicle height (see page sp-3).
Inspect toe-in
Standard toe-in
If the toe-in is not within the specified range, inspect the
suspension parts and replace them if necessar ...
Replacement
discharge refrigerant from refrigeration system
Start up the engine.
Turn the a/c switch on.
Operate the cooler compressor with an engine
speed of approximately 1,000 rpm for 5 to 6 minutes
to circulate the refrigerant and collect the
compressor oil remaining in each component int ...
Front lower ball joint
Components
Removal
Hint:
Use the same procedures for the rh side and lh side.
The procedures listed below are for the lh side.
Remove front wheel
Remove front speed sensor lh (for 2wd) (see
page bc-191)
Remove front brake cylinder assembly lh
(see page br-40)
Remove front ...
