Toyota RAV4 (XA40) 2013-2018 Service Manual: Terminals of ecu
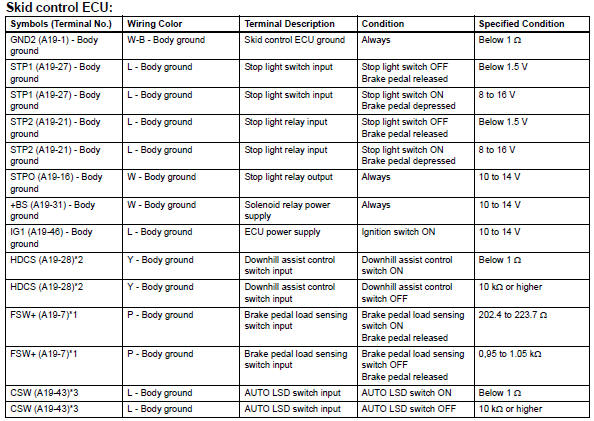
- Skid control ecu
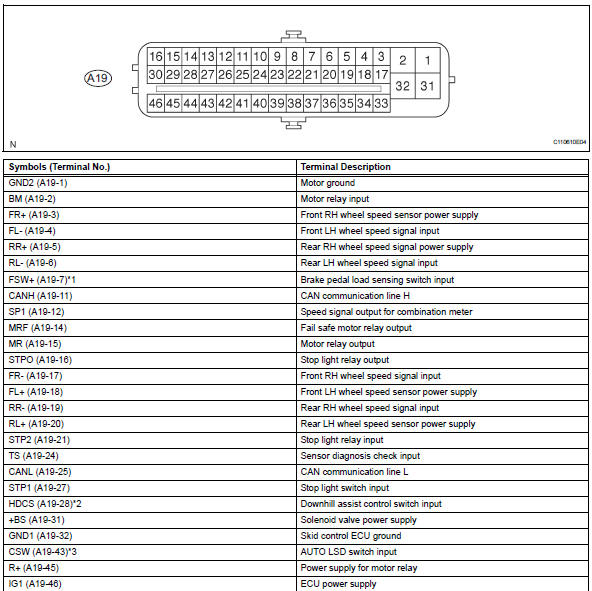
Hint:
*1: W/ 16-inch disc
*2: W/ downhill assist control
*3: For 2wd (w/ auto lsd)
- Check skid control ecu
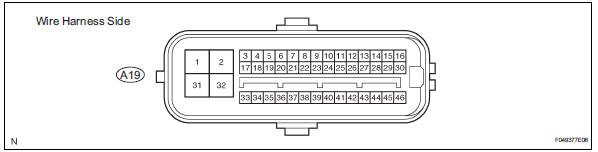
- Disconnect the a19 ecu connector.
- Measure the voltage and resistance of the wire harness side connector.
Hint:
The voltage cannot be measured with the connector connected to the skid control ecu as the connector is water resistant.
Hint:
*1: W/ 16-inch disc
*2: W/ downhill assist control
*3: For 2wd (w/ auto lsd)
If the result is not as specified, there may be a malfunction on the wire harness side.
- Check instrument panel junction block (main body ecu)
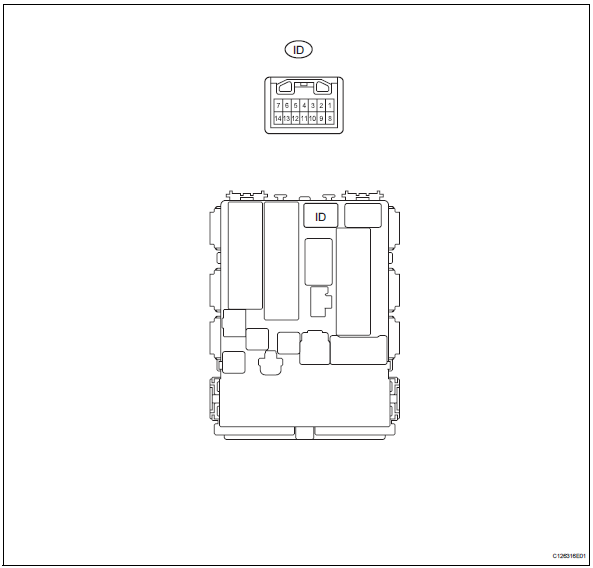
- Disconnect the id junction block connector.
- Measure the resistance of the wire harness side connector.

If the result is not as specified, there may be a malfunction on the wire harness side.
- Reconnect the id junction block connector.
- Measure the voltage of the wire harness side connector.

If the result is not as specified, the junction block (ecu) may be a malfunction.
 Problem symptoms table
Hint:
Use the table below to help determine the cause of the
problem symptom. The potential causes of the symptoms
are listed in order of probability in the "suspected area"
column ...
 Diagnosis system
Diagnosis
If the skid control ecu detects a malfunction, the abs,
vsc and brake warning lights and the slip, downhill
assist control and auto lsd indicator lights come on in
accordance with t ...
Other materials:
Short in front passenger side curtain shield squib circuit
Description
The front passenger side curtain shield squib circuit consists of the center
airbag sensor and the curtain
shield airbag rh.
The circuit instructs the srs to deploy when the deployment conditions are met.
These dtcs are recorded when a malfunction is detected in the front p ...
Rear window and outside rear view mirror defoggers
These features are used to defog the rear window, and to
remove raindrops, dew and frost from the outside rear view mirrors
(if equipped).
Vehicles with a manual air conditioning system
On/off
The defoggers will automatically
turn off after approximately 15 minutes.
Vehicles with an au ...
Inside rear view mirror
The rear view mirror’s position can be adjusted to enable sufficient
confirmation of the rear view.
Adjusting the height of rear view mirror
The height of the rear view mirror can be adjusted to suit your driving
posture.
Adjust the height of the rear view
mirror by moving it up and down.
...
