
Toyota RAV4 (XA40) 2013-2018 Service Manual: 4Wd control ecu communication stop mode
Description

Hint:
For vehicle with 4wd only.
Wiring diagram
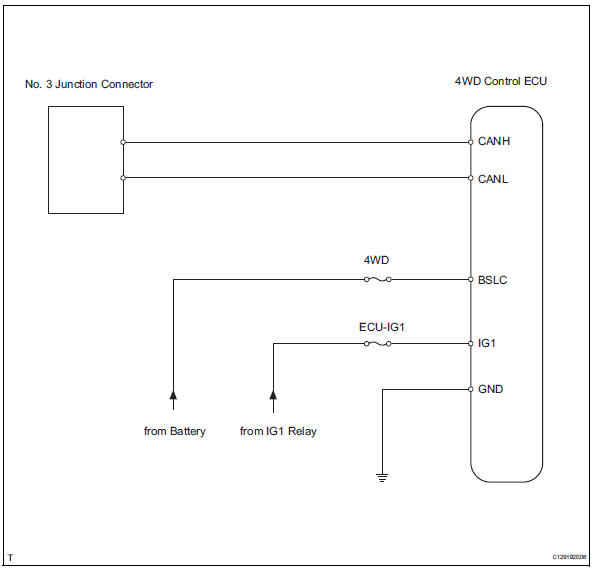
Inspection procedure
Notice:
- Turn the ignition switch off before measuring the resistances of the main wire and the branch wire.
- After the ignition switch is turned off, check that the key reminder warning system and light reminder warning system are not in operation.
- Before measuring the resistance, leave the vehicle for at least 1 minute and do not operate the ignition switch, any switches or doors. If doors need to be opened in order to check connectors, open the doors and leave them open.
Hint:
Operating the ignition switch, any switches or any doors triggers related ecu and sensor communication with the can, which causes resistance variation.
- Check can bus line for disconnection (4wd control ecu branch wire)
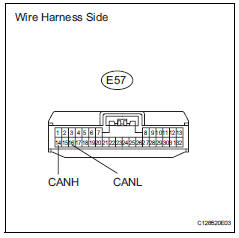
- Disconnect the e57 4wd control ecu connector.
- Measure the resistance of the wire harness side connector.
Standard resistance


- Check wire harness (4wd control ecu - battery and body ground)
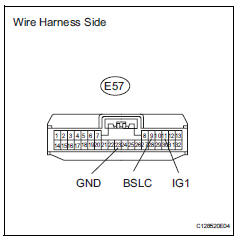
- Disconnect the e57 4wd control ecu connector.
- Measure the resistance of the wire harness side connector.
Standard resistance 
- Measure the voltage of the wire harness side connector.
Standard voltage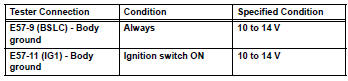


Replace 4wd control ecu
 Center airbag sensor communication stop mode
Description
Wiring diagram
Inspection procedure
Notice:
Turn the ignition switch off before measuring the resistances of the
main wire and the branch
wire.
After the ignition swi ...
 Can bus line
Description
When any dtc for the can communication system is output, first measure the
resistance between the
terminals of the dlc3 to specify the trouble area, and check that there is not a
sho ...
Other materials:
Stop light switch circuit
Description
When the stop light switch is turned on, current flows to the stop lights to
illuminate them.
Wiring diagram
Inspection procedure
Inspect fuse (stop)
Remove the stop fuse from the instrument panel
junction block.
Measure the resistance of the fuse.
Standard resi ...
Data list / active test
Read data list
Hint:
Using the intelligent tester's data list allows switch,
sensor, actuator and other item values to be read without
removing any parts. Reading the data list early in
troubleshooting is one way to save time.
Connect the intelligent tester to the dlc3.
Turn the igni ...
General maintenance (2006/01- )
Inspect drive belt (see page em-7)
Replace spark plugs (see page ig-7)
Replace air cleaner filter
Remove the air filter.
Visually check that the air filter is not excessively
damaged or oily.
Replace the air filter with a new one, if necessary.
Replace engine oil and oil fil ...
