
Toyota RAV4 (XA40) 2013-2018 Service Manual: Data list / active test
- Read data list
Hint:
Using the intelligent tester's data list allows switch, sensor, actuator and other item values to be read without out removing any parts. Reading the data list early in troubleshooting is one way to save time.
- Connect the intelligent tester (with can vim) to the dlc3.
- Turn the ignition switch on.
- Turn the intelligent tester on.
- Read the data list according to the display on the tester.
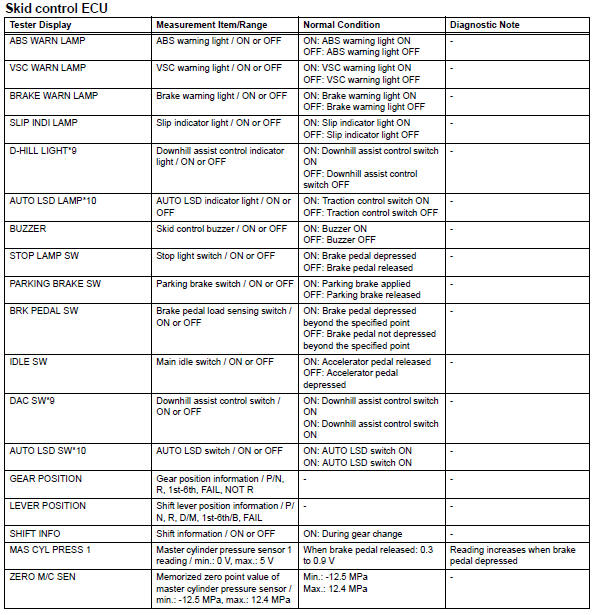
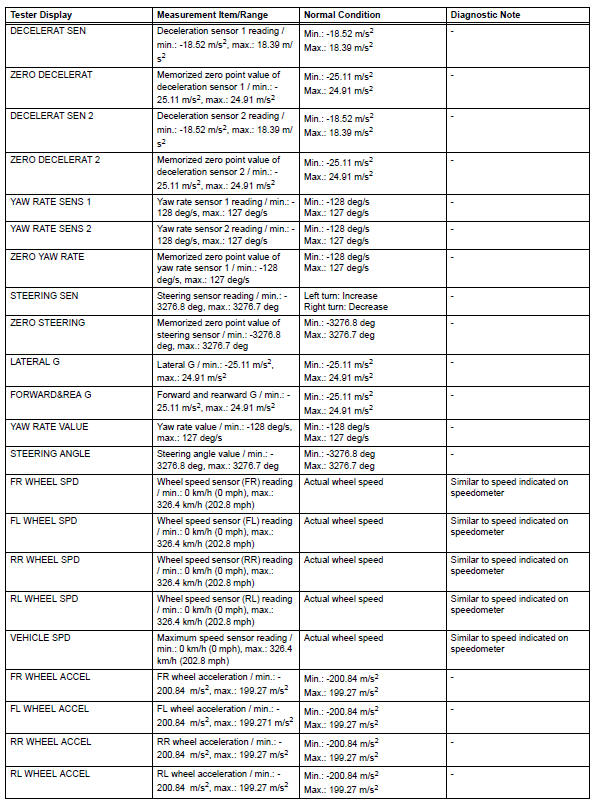
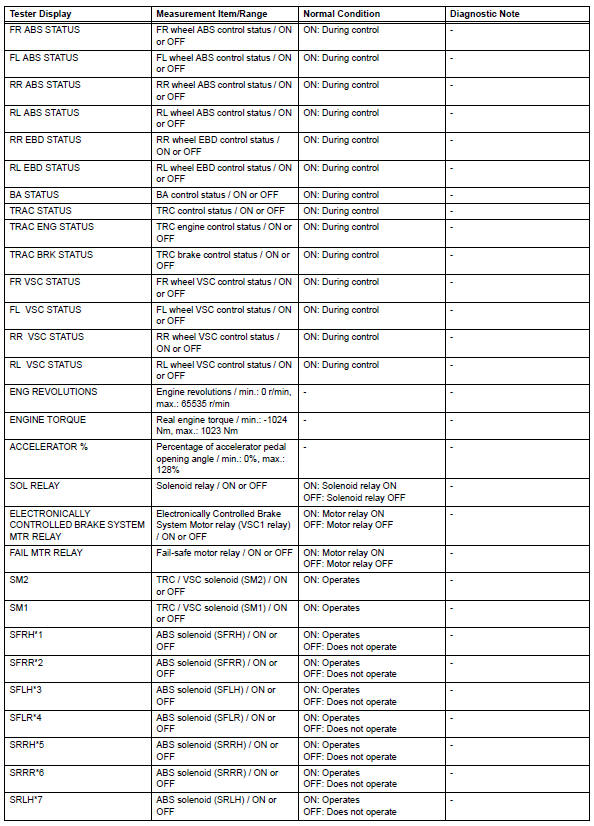
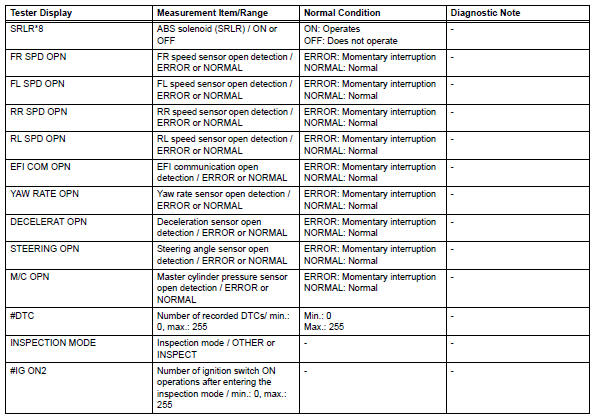
Hint:
- *1: Sfrh (s: solenoid, f: front, r: right, h: holding)
- *2: Sfrr (s: solenoid, f: front, r: right, r: reduction)
- *3: Sflh (s: solenoid, f: front, l: left, h: holding)
- *4: Sflr (s: solenoid, f: front, l: left, r: reduction)
- *5: Srrh (s: solenoid, r: rear, r: right, h: holding)
- *6: Srrr (s: solenoid, r: rear, r: right, r: reduction)
- *7: Srlh (s: solenoid, r: rear, l: left, h: holding)
- *8: Srlr (s: solenoid, r: rear, l: left, r: reduction)
- *9: W/ downhill assist control
- *10: For 2wd (w/ auto lsd)
- Parform active test
Hint:
Performing the intelligent tester's active test allows relay, vsv, actuator and other items to be operated without removing any parts. Performing the active test early in troubleshooting is one way to save time.
The data list can be displayed during the active test.
- Connect the intelligent tester (with can vim) to the dlc3.
- Turn the ignition switch on.
- Turn the intelligent tester on.
- Perform the active test according to the display on the tester.
Hint:
- The ignition switch must be turned on to proceed to the active test using the intelligent tester.
- The active tests of the abs solenoid, abs motor relay, abs warning light and brake warning light are available when the vehicle is stopped.
- The motors stop automatically after 5 seconds of
activation to prevent them from being damaged.
When the motors are driven repeatedly, certain intervals are required.
- Each solenoid stops automatically after 2 seconds of activation to prevent them from being damaged, and can be operated again after a certain interval.
- Do not depress the brake pedal while only the pressure reduction solenoid valves are on.
- Do not drive 2 or more solenoids simultaneously except to operate the pressure holding solenoid valves and pressure reduction solenoid valves of each wheel.
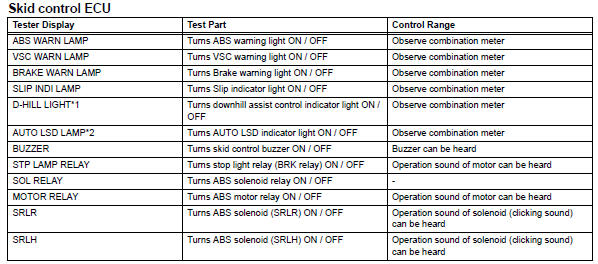
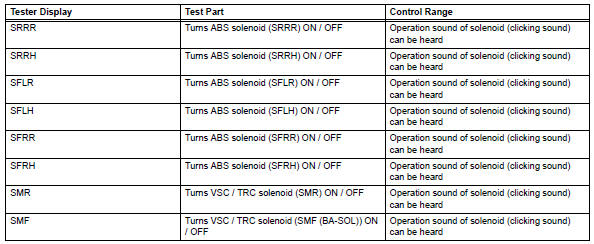
Hint:
*1: W/ downhill assist control
*2: For 2wd (w/ auto lsd)
 Fail-safe chart
Fail safe operation
If there is a problem with any sensor signals or
actuator systems, the skid control ecu prohibits the
power supply to the abs and traction actuator
and informs the e ...
 Diagnostic trouble code chart
Hint:
If no abnormality is found when inspecting parts, check the
skid control ecu and check for poor contact at the ground
points.
If a dtc is displayed during the dtc check, check the
ci ...
Other materials:
Dtc check / clear
Check dtc
Dtcs which are stored in the ecm can be displayed
with the intelligent tester.
The intelligent tester can display pending dtcs and
current dtcs. Some dtcs are not stored unless a
malfunction is detected in consecutive driving
cycles. When a malfunction is detected ...
Freeze frame data
Freeze frame data
Hint:
Whenever a dtc is detected or the abs operates,
the skid control ecu stores the current vehicle
(sensor) state as freeze frame data.
The skid control ecu stores the number of times
(maximum: 31) the ignition switch has been turned
from off to on since the ...
Blower motor
On-vehicle inspection
Inspect blower motor (for automatic air conditioning system)
Disconnect the blower motor connector.
Connect the positive (+) lead from the battery to
terminal 1 and negative (-) lead to terminal 2, and
then check that the motor operates smoothly.
If the ...
