Toyota RAV4 (XA50) 2019-2026 Owners Manual: Driving information display
Select to display fuel consumption data in various forms.
тЦа Fuel Economy
Following information is displayed.
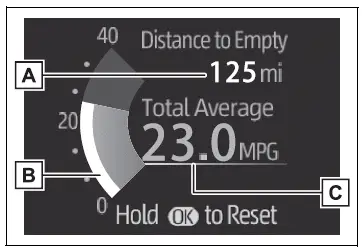
- Distance to empty
Displays the driving range with remaining fuel. - Current fuel economy Displays the instantaneous current fuel Economy.
- Average fuel economy
Displays the average fuel economy
since the function was reset or the

average fuel economy after starting or refueling.*1, 2, 3
The average fuel economy selected by "Fuel Economy" on the screen is displayed.
*1:Use the displayed fuel consumption as a reference only.
*2:Average fuel economy since the
function was reset can be reset
by pressing and holding  .
.
*3:Average fuel economy after
starting is reset each time the engine stops.
тЦа Eco Driving Indicator/Distance to empty
Display contents
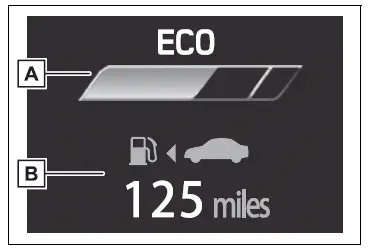
- Eco Driving Indicator
- Distance to empty
Displays the driving range with remaining fuel.
Eco Driving Indicator
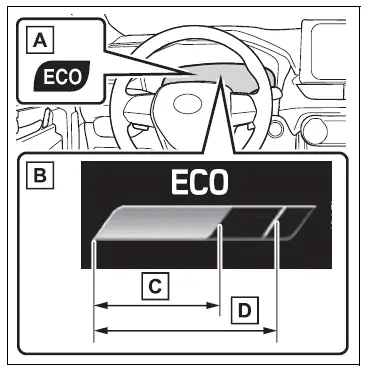
- Eco Driving Indicator Light
During Eco-friendly acceleration operation (Eco driving), the Eco Driving Indicator Light will turn on.
When the acceleration exceeds Zone of Eco driving, or when the vehicle is stopped, the light turns off.
- Eco Driving Indicator Zone Display
Suggests the Zone of Eco driving with current Eco driving ratio based on acceleration.
- Eco driving ratio based on acceleration
If the acceleration exceeds Zone of Eco driving, the right side of Eco Driving Indicator Zone Display will illuminate.
At this time, the Eco Driving Indicator Light will turn off.
- Zone of Eco driving
тЦаDistance to empty
- This distance is computed based
on your average fuel consumption.
As a result, the actual distance that can be driven may differ from that displayed.
- When only a small amount of fuel
is added to the tank, the display
may not be updated. When refueling,
turn the engine switch to OFF.
If the vehicle is refueled without turning the engine switch to OFF, the display may not be updated.
- When "Refuel" is displayed, the
remaining fuel amount is low and
the distance that can be driven
with the remaining fuel cannot be
calculated.
Refuel immediately.
тЦаThe ECO Driving indicator will not operate when
Eco Driving Indicator will not operate in the following conditions:
- The shift lever is in any position other than D.
- Neither normal mode nor Eco drive mode is selected.
- The vehicle speed is approximately 80 mph (130 km/h) or higher.
Driving support system information display
тЦа Driving support system information display
Select to display the operational status of the following systems:
- LTA (Lane Tracing Assist)
- Dynamic radar cruise control with full-speed range
- RSA (Road Sign Assist) (if equipped)
Navigation system-linked display (if equipped)
Select to display the following navigation system-linked information.
- Route guidance
- Compass display
Audio system-linked display (if equipped)
Select to enable selection of an audio source or track on the display.
 Changing the display
The multi-information display is
operated using the meter control
switches.
Scroll the screen*/switch the
display*/move the cursor
Press: Enter/Set
Press and hold: Reset/Display
customizable it ...
 Vehicle information display
тЦа Drive information
2 items that are selected using
the "Drive Info Items" setting
(average speed, distance and total time) can be displayed vertically.
The displayed information
changes according ...
Other materials:
Diagnosis system
Description
Engine immobiliser system data and diagnostic
trouble codes (dtcs) can be read through the
vehicle's data link connector 3 (dlc3). In some
cases, a malfunction may be occurring in the engine
immobiliser system even though the security
indicator light is not illuminated ...
Customization
Customizable features
Your vehicle includes a variety
of electronic features
that can be personalized to
suit your preferences. The
settings of these features
can be changed using the
multi-information display,
navigation/multimedia system,
or at your Toyota
dealer.
Customizing vehicle features
тЦа ...
Cd player operation
Insert disc or select тАЬcdтАЭ on the audio source selection screen
with a disc inserted to begin listening to a cd.
Audio control screen
Pressing the тАЬaudioтАЭ button displays the audio control screen from
any screens of the selected source.
Audio source selection screen
appears
Displ ...
